
Quick Navi -
- Why Build Your Own OVER Buying Outright
- Get Your Plane Built in just 12 Steps
- 1. Design your plane using CAD software
- 2. Take into an account all the electronics and get an idea of total RC plane weight
- 3. Take care of wingspan and wing area
- 4. Carefully calculate the tail area
- 5. Design a fuselage
- 6. Use your preferred material to create what you’ve designed
- 7. Start with the tail
- 8. Connect the electronics properly
- 9. Don’t forget a motor mount
- 10. Finally, attach the wing
- 11. Install the landing gear if you want
- 12. It’s time for the test ride
- End Result & What To Watch Out For?
Why Build Your Own OVER Buying Outright
 Building an RC plane isn’t simple, I won’t lie to you. However, I’m not saying it isn’t possible. What if I told you that you can build your own RC plane and save some money on buying a pre-built one? Aside from saving additional cash, building your own plane is great to get more into the topic of RC planes, learn more about their parts, their mechanics, electronics and the way of working. The RC planes might just look simple at a first glance, but they are very, very complex machines when it comes to the heart of what makes them work.
Another reason why you should build your own RC plane instead of buying one is that you’ll know exactly how to repair it if it gets broken. Let’s say your plane can’t fly properly or start the engine. You’ll immediately know where your engine is located, what engine is this, how it’s made and how to fix the possible issue. One of the greatest benefits of this method is that you can add your own paint, logo, or whatever you want. You can finally have something that’s YOURS from A to Z. If you’ve read our review to this point, I’m pretty sure you want to build an RC plane for yourself. As wasting your time isn’t an option, we’ll get into details right now.
Materials You’ll Need:
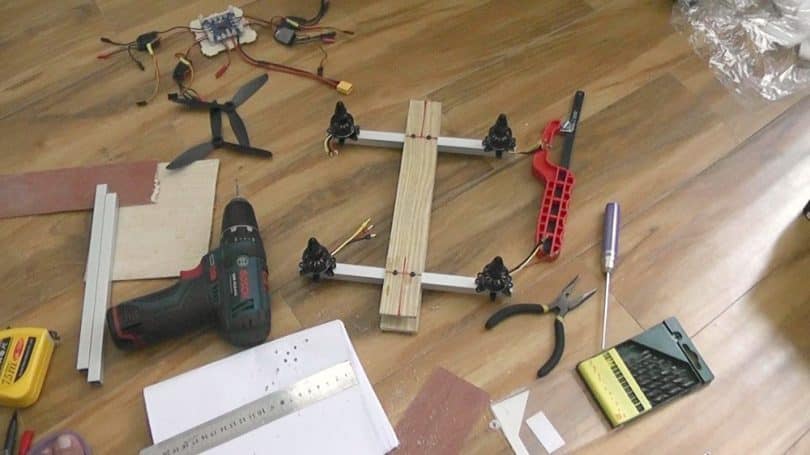 Before you start assembling your plane, it’s very important to gather the materials you need. Aside from that, you want to use a material which you’ll use for constructing your plane. With that in mind, let’s take a look at what do you need before you start.
- A foam board or carbon fiber (more expensive option),
- Servos,
- A propeller,
- A receiver for your plane,
- An Electricity Powered or Gas Powered engine,
- The controller,
- A power source,
- A power plant,
- ESC (Electronic Speed Controller),
- BEC (Battery Eliminator Circuit),
- Li-Po battery or gasoline.
Get Your Plane Built in just 12 Steps
1. Design your plane using CAD software
If you simply grab a pen and start writing and drawing everything on the paper, it would look atrocious and will probably be unuseful. Instead, you want to use a corresponding CAD software for modeling and simulation. First, think about the purpose of your plane. This will help you decide how to start modeling your plane.
2. Take into an account all the electronics and get an idea of total RC plane weight
Every RC plane comes with a huge array of electronics built inside. The batteries, receiver, and servos are all carrying a certain weight, so it’s best to use a sturdy and durable material. Grab your preferred motor, channel receiver, servos, and power source and get them ready. You can also use a beam scale to measure the weight. Approximately, you want your plane to be three times heavier than the electronics. If your electronic installations weigh around 500 g, you should aim for at least 1.5 kg of total weight.
3. Take care of wingspan and wing area
As your RC plane isn’t a rocket, you’ll need to take a special care of the wings. Depending on the size you intended your plane to be, you need to calculate a total wing area. Thankfully, there are tons of online calculators to help you with this. When it comes to wingspan, you want your wings to be a little bit longer and leaned if you want your plane to glide. But, if you want to do some acrobatics, short and wide wings are always a better choice.
4. Carefully calculate the tail area
The tail is a necessary part of your RC plane. Did you complete the previous step? If you did, now remember your wing area and divide it by three and you got yourself a complete tail area. You’ll need this info in your later tail creation.
5. Design a fuselage
Fuselage (body) of your plane is what will hold all of the parts together, including electronics, tail, and wings. Generally, there aren’t strict rules and you can to that however you want. Try to design a narrow rear side of the plane and a little wider front side.
6. Use your preferred material to create what you’ve designed
If you’ve carefully measured all of your parts, now it’s time to get your foam board and turn your imagination into reality. Measure and cut down piece by piece until you collect all the necessary parts.
7. Start with the tail
First, create the tail and then the front portion of the plane. Second, create a central part and glue them together. I don’t recommend doing this all in one because it’s easier to make a mistake. Instead, just follow the order we’ve mentioned. You can also put your propeller at the front side of the plane.
8. Connect the electronics properly
Electronics are based around the fuselage and you’ll need to attach some parts outside or in the fuselage itself. In the fuselage, you want to place a receiver and the battery. This will ensure that these components are well-protected. Outside the fuselage, you want to stick your ESC and BEC in order to cool your plane. Finally, stick your servo to the stabilizer and let the glue become dry.
9. Don’t forget a motor mount
If you just stick your motor onto the plane, it will not have the required stability and would eventually fall off at high speeds. Be sure to create a motor mount by using a couple pieces of foam and place them to the side and bottom of the plane’s body. After the glue becomes dry, just place your motor inside the mount.
10. Finally, attach the wing
For this part, try to get the strongest glue you can. You don’t want your wing to fall off when the strong wind hits your plane, do you? If not, then mount your wing slightly towards the front part of the plane and watch out the fuselage’s center of gravity.
11. Install the landing gear if you want
RC planes often have the landing gear. Landing gear is here to make your plane’s landing much smoother and easier. However, this is an optional upgrade and if you want to include it, be sure to put two wheels in the front and a tail wheel just below the tail.
12. It’s time for the test ride
What are you waiting for? As soon as your plane becomes stable and won’t fall apart, it’s time to grab your transmitter and start flying!
End Result & What To Watch Out For?
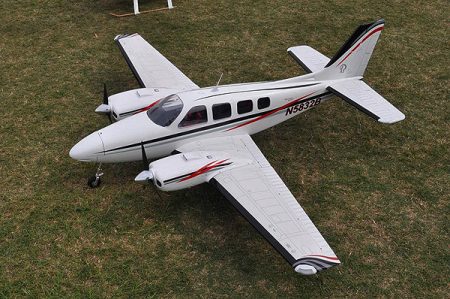 The end result will be a completely capable RC plane that can perform great (you can actually read a lot more here topratedanything.com/reviews-of-todays-best-radio-controlled-airplanes). Have in mind that branded RC planes are usually produced in the factory, which grants a much higher precision and builds quality. However, everything has its price and that’s exactly what I’m talking about. When you decide for building your own RC plane, you need to know that it can be time-consuming for a beginner.
You can spend a few days modeling and creating the parts for your plane, which can be really fun. The only thing to watch out is that you’ve connected the electronics correctly before you test run your plane. If you love crafting stuff and have a special interest in RC planes, I see no reason not to build one!

3 Comments
as an engineer, I see this post as a challenge and not just a simple hobby building planes. The challenge here is designing my own. Tricky. Say, would you know where i can get the materials for building one. I’m sure there’s plenty but I would like to hear from your opinion. Where is the best store i can get these materials from? Can i order from them on the net or should i go ahead and see them in store. I think i know what my new years resolution will be.
Sounds like my Father, also an engineer and this is his favorite hobby. Ordering online now a days is the same or better than in store. Double check the warranty and return information and you should be good to go!
wow. your article is making me want to build my own rc plane! I know season’s about to change into fall, so, it might be more difficult to go for test rides, but, i just gotta say this is inspiring me to build my own. It just makes sense. and one day, I can show them all to my kids and to my grand kids. Wouldn’t that be grand. still in high school but i like thinking ahead. hehehe. You are very right with your last sentence. “I see no reason not to build one!” i couldn’t agree more.