

A Step-by-step Guide to Changing your Car’s Motor Oil
When I was growing up, weekends did not only mean playing out in the streets. It also meant helping out my father clean his car and watch him change some parts every now and then.
One of my most favorite learning and bonding activity that we would do whenever we worked on our car was changing the car’s motor oil. He would always tell me that his father taught him how to do it. Now that he has become a father, he wants to continue this legacy and pass it on to me as his child.
To be honest, I just liked being around my father . As a child, I didn’t really bother so much about the world, about cars and let alone to understand the importance of changing the car’s motor oil or the car oil filter.
Looking back, it was really just having been able to spend time with my father that I have saved in my heart. Working on our car developed our relationship even closer. And, thanks to the many Sundays I stood by our car’s hood, sat and laid down right under our car that I learned the step-by-step guide to changing a car’s motor oil.
Ten Easy Steps to Changing a Car’s Motor Oil
Quick Navi -
- Ten Easy Steps to Changing a Car’s Motor Oil
- Step 1: Do the Dip Stick.
- Step 2: Warm up your Car’s Engine.
- Step 3: Find the Oil Container’s Drain.
- Step 4: Place a Container Under the Drain.
- Step 5: Open the Oil Container’s Drain.
- Step 6: Clear the Container from all the Contents.
- Step 7: Take Out the Old Oil Filter and Clean the Oil Filter Slot
- Step 8: Put New Oil Filter and O-rings.
- Step 9: Put New Engine Oil.
- Step 10: Start your Engine!
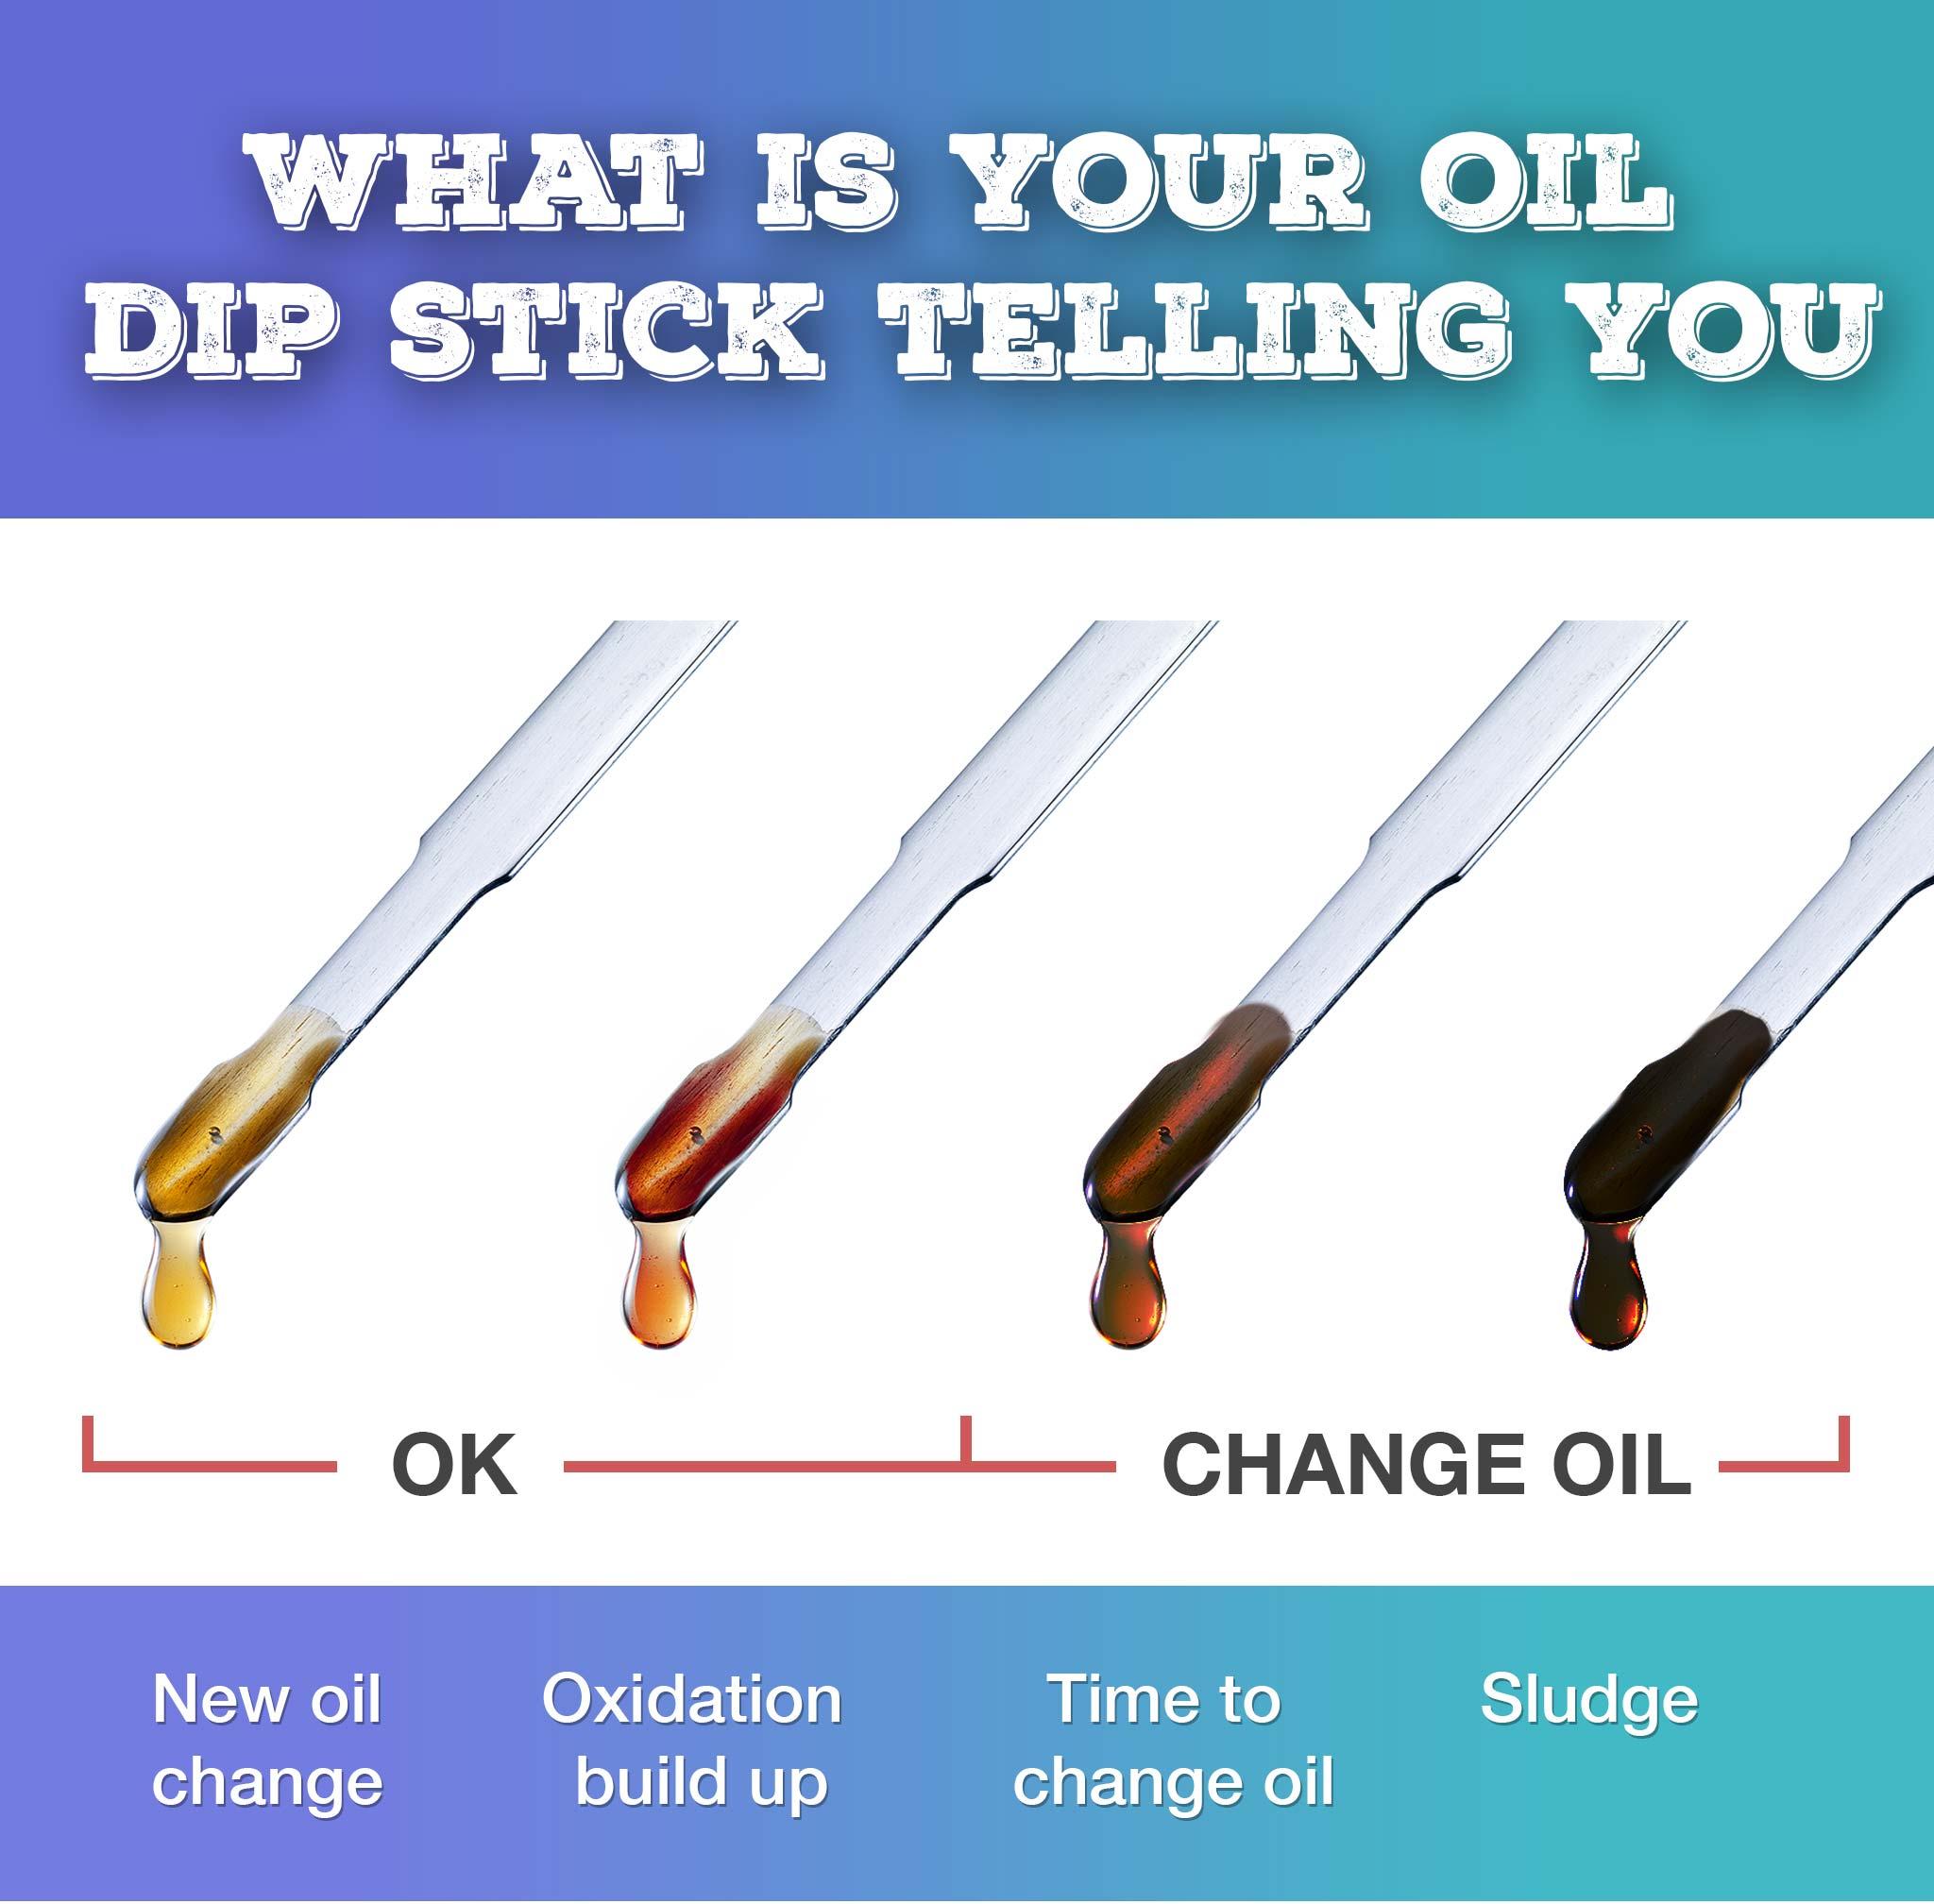
Step 1: Do the Dip Stick.
The very first step that my father taught me when changing a car’s motor oil is to dip a stick into the oil container. According to him, you can’t rely so much on your car’s oil indicator on the dash. Depending on the weather condition, the oil indicator will show different levels than the actual situation.
Over the years I have come to observe and get what he was trying to say. In summertime, my oil in the indicator says it’s still full and in colder weather, it says I have less oil. To prevent uncertainty, he’s always told me to keep a dip stick nearby.
A dip stick is this metallic rod that you can use to gauge your car’s oil levels by dipping it right into the oil chute (hence its name).
The dip stick does not only give you a more accurate measurement of your car’s oil level, it will also be able to show you the current situation in the oil container.
When the oil on your dip stick appears to be golden and has that pretty nice viscosity, it means that your oil is new and does not require to be cleaned out just yet. The more you use your car, the oil will oxidize and in layman’s terms, will “cook” inside your engine. Like a butter on a hot pan, it will have a more burnt color and will have a heavier consistency. This is the optimum time to change oil.
Don’t let your car oil reach level four in color gradation! This will cause build up and may cause engine malfunction if you let this sludge-y oil sit in your car for a long time.
Step 2: Warm up your Car’s Engine.
After checking your car’s oil level and status, the next step that you’ll have to do is to warm it up.
My father always says that it’s important to let the engine run for a good 10 minutes. During which, he would let me rev up the engine too. Other times, we would go for a short drive in the neighborhood. Go for a block and then return to our house. Once we’re back, I get to eat snacks!
My dad lets it cool down for a few minutes until the engine is cool enough to touch. You don’t want to immediately touch an engine that has run for that amount of time. Trust me. I know the feeling.
Warming up the car’s engine will help the oil move around the car’s system for a few minutes and will make the oil a little more “workable” so to speak.
This is especially necessary when you live in a country where there is cool weather or climate. But even if you live in a warmer country, you’d still need to warm up your engine for that reason.
Pro tip: Make sure that your car’s engine is off. The car is on a flat, level, and stable ground to prevent the oil from leaning towards one part of the container.
Step 3: Find the Oil Container’s Drain.
The next step to changing your car’s oil is finding the oil container’s drain.
The location of your car’s oil container drain varies just as much as one car brand is different from the other. You just can’t turn any bolt or gasket to your liking.
In order for you to find the drain easier, check out your car’s manual. If you observe your car engine, you’ll figure out that the drain might be. However, you need to remember that you’ll need to be right underneath your car to actually see this drain. Otherwise you might be turning a screw by mistake and can cause you an even bigger problem.
Step 4: Place a Container Under the Drain.
Before you even start turning that plug or gasket, make sure you have a container right under the drain to catch all of the gunk from the container.
Don’t ever forget to place this container because oil is toxic to environment. Furthermore, burnt oil from your car is one of the hardest things to remove from clothing and can cause irritation to the skin.
Pro tip 1: In my experience, the most effective way of removing oil from your clothes is letting baby powder soak up all the oil and then use a dish washing soap to lift it further. Making sure that the water is always warm is always a good idea. There are other methods that you can use to remove oil effectively. You can check out this guide from Wikihow on the 4 Methods to Remove Grease or Oil Stains from Clothing.
Pro tip 2: Grease on skin, I often just scrub it away. Unlike with clothes where I use baby powder, I would put some teaspoons of salt in my hand and add dish washing liquid. This creates a physical exfoliation while scrubbing and at the same time, the dish washing soap helps break down the oil making it easier to wash.
Step 5: Open the Oil Container’s Drain.
After finding your oil container’s gasket and of course, ensuring that there’s a catch basin for the oil that you’re going to drain, it’s time to open the oil container’s gasket.
Carefully turn the screw and watch out for any splatter and spillage. Use a wrench to help remove the gasket from its vessel.
Pro tip: If you don’t like going under your car, you can always perform a top-down oil change. This is the recommended oil changing method when you have your oil container located at the top of your engine. An extractor will help suction out all of the oil. This eliminates the necessity of working so hard to remove the plug of the oil container.
Step 6: Clear the Container from all the Contents.
Keep the oil flowing out of your car. This process takes a little while to finish so, remain patient. Play some games on your phone or read a book while you’re waiting for all of the oil to get flushed out.
Step 7: Take Out the Old Oil Filter and Clean the Oil Filter Slot
Aside from reading a book, you can always continue working while you’re waiting for the oil to get completely drained. You have a drain pan, anyway!
So, the next step is to take out your old oil filter and cleaning the oil filter slot. This step may seem unnecessary but, it actually makes sense because you’re putting new oil.
Step 8: Put New Oil Filter and O-rings.
After cleaning removing the old oil filter and cleaning the filter slot, the next step is to put in a new oil filter and o-rings.
Replacing the old filter with a new one will give your car an even better run. If you retain your old oil filter, it’s like putting back all the dirt together with the new oil. Also, you’re risking damage to the car since an old oil filter will not be as effective at filtering anymore.
It is also important to get fresh o-rings whenever you change your car oil.
O-rings are what create the seal between your cap and the oil container. The o-rings are made up of rubber and over time can wear down especially since it is exposed to hot oil.
Fresh o-rings will help ensure that the oil will not leak from the container.
Step 9: Put New Engine Oil.
Once all the draining and cleaning is complete, it’s now time to put the new engine oil.
For first-time DIY oil changers, we cannot stress it enough just how important it is for you to know what oil suits your car.
Think of this as getting the correct blood type for your body. Failure to get the right kind of oil will cause your car to break down.
In order to know what kind of oil you should use for your car, there’s no other way but to consult your car’s manual.
Your car manual has loads of information that you, as the owner, needs. From the right kind of tire pressure, to the right kind of light bulb, and right down to the right kind of engine oil.
Your car manufacturer will enlist the type and possibly, a recommended brand that will go well with your car. It will say what kind of oil will suit your car best depending on different conditions. Car manufacturers will let you know the kind of oil you will use if you’re driving it in cold climate or warm climate.
There’s nothing more “pro” than knowing your car manual by heart. So, be sure to read up!
Pro tip: If your oil container has a smaller mouth than your oil gallon, you can always use a good old funnel. Just make sure not to use it for your home!
Step 10: Start your Engine!
Congratulations! You’ve made it through the whole grimy task! You just have one final obstacle to leap and that is, starting your engine.
This last step is crucial because it will allow you to see that your car oil is running through the channels properly.
Your car may take a while to indicate the right oil level. After all, you’ve completely drained it! So be sure to remain patient and let the car run on its own for about 5 to 10 minutes.
Do not rev it or run the car around the neighborhood! Again, you’re checking to see if you’ve done everything right up to this point.
If you think that your car is not running properly, be sure to call a specialist immediately. A specialist will be able to give you the right assessment so you can rest assured that the next time you DIY changing your car oil, you won’t encounter any negative experience again.
Pro tip: Do not just run the engine one time. Do this one final check three times and letting it totally cool down in between each check before you drive your car around. By doing so, you will be getting a more accurate picture of what’s going on inside your engine.
[mydivider]These ten very easy steps to changing a car’s motor oil has been passed down to me from my father’s father which I am now passing on to you, our dear readers.
This very mundane activity might be boring to some but it is one of the most important maintenance work you will ever do to your very own car.
If you’re not confident changing your own car’s oil yet, you can always bring it to your trusted mechanic and they can always do this for you.
I think the best thing about doing this task on your own is that you will be saving more money in the long run. And, of course, you will know more about your car each time you DIY your car’s oil change.
At Topratedanything.com, we do not only aim to give you reliable reviews of the best products available in the market today, but also, provide you with the most comprehensive guides to solving your tasks with breeze.

4 Comments
The steps you mentioned are very straightforward and the article is very direct to the point. However, despite being written that way, I still cant figure it out because I’m merely a simpleton!!! A video would very much help. I love going to TRA because of the articles and topics you feature. Always interesting and always fresh
I don’t use my car often… but when i do… loljk. But seriously though, I really dont use my car often and a lot of times I just wanna give up and sell it because of the amount of maintenance it takes. I want to help the environment by becoming that one less car on the road. So, that said, for me to know whether it’s time for an oil change I always do the dipstick method. Or, I just randomly open up the hood and check the filter.
My only favorite part in this changing the oil and filter is starting the engine. In other words, when it’s all over! hahaha It’s so tiring to do this step especially when you’re alone and when you’re broke! Obviously it’s cheaper to do it on your own. but either way you still gotta learn this though, even though it’s not the cleanest/easiest thing to do.
Love your pro tips in this article. It was my uncle who taught me the dip stick and my dad who told me to listen carefully to the car. just because the sounds aren’t that prominent, you can still hear something if you listened carefully. These two advises have saved me so many many times! Saved me from so many costly repairs.